The best way to do a clean installation of macOS Mojave 10.14 is to create and use a bootable USB. Although it’s still in beta, you can still install the new operating system by following the tutorial we’re showing you today, whether you’re a developer or you’ve already signed up for the recently released public beta; likewise, if you prefer to wait, save this post in your favorites and put it into practice with the official release that will take place at the end of September.
Clean installation of macOS Mojave 10.14
Before you start you must get a USB 3.0 drive that has at least 8 GB of storage. If you’re a MacBook user, you’d better get a USB-C. In Amazon, you have good options at a very good price. Once you have it, simply follow the steps below to the letter:
Step 1: Download the macOS Mojave installer. Once macOS Mojave 10.14 is officially released, you can download it directly from the Mac App Store. Until then, you’ll need to access the beta version of Mojave from the Apple Developer Portal, or through the Apple Public Beta Program website.
Step 2: Once the download of macOS 10.14 Mojave is complete, close the installer that appears on your computer’s screen using the Command keyboard shortcut ⌘ + Q.
Step 3: Now open the Finder, go to the Applications folder and right-click on the macOS 10.14 installer you just downloaded and select the Show package contents option.
Step 4: Then open the Contents folder → Resources.
Step 5: Open a Terminal window through Applications → Utilities → Terminal, or by pressing the keyboard shortcut Command ⌘ + spacebar and typing “Terminal” in Spotlight”.
Step 6: In the Terminal window you just opened, type the word sudo followed by a space.
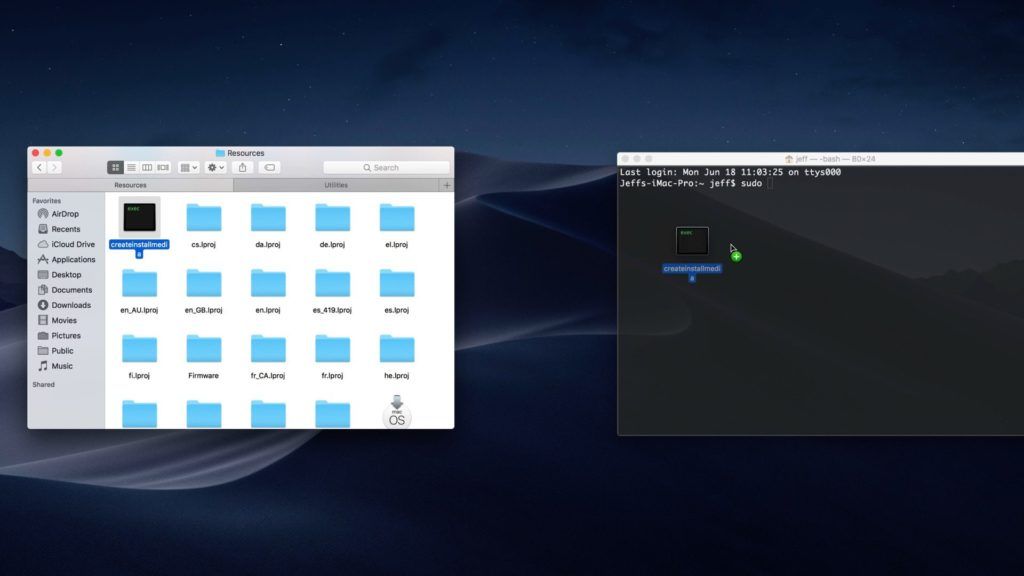
Step 7: Save by dragging create install media to the Terminal window from the Finder location we left in step four.
Drag the create install media file from the Finder window to the Terminal window | IMAGE: 9to5Mac
Step 8: Now, in the Terminal, type -volume followed by a space.
Step 9: In the Finder menu bar select the path Go → Go to the folder …
Step 10: In the “Go to folder” dialog box that appears on the screen, type the following: /Volumes and click Go.
Step 11: Connect the USB drive we mentioned earlier to your Mac, and it should appear in the Finder window.
Step 12: Drag and drop the volume from the USB flash drive to the Terminal window.
Step 13: Then press Enter on the keyboard to launch the full command.
Step 14: Enter a ‘and’ to continue when prompted and press Enter again on your keyboard.
At this point, the process of creating a macOS Mojave 10.14 installation USB will start. This process will start by deleting the contents of the flash drive you are using for it and copying the installer files into it. You must be patient, and not touch anything. Don’t forget that the process will take about 20 to 30 minutes. You just have to wait.
Once the process is complete, you can now use the USB flash drive to boot your Mac with the macOS Mojave 10.14 installer. Simply plug in the flash drive and reboot your Mac while holding down the Option key (⌥). Select the macOS Mojave installer and follow the usual steps shown on the screen.
