How to capture in portrait mode in iPhone? The portrait mode adds the so-called bokeh effect to the photos, in which the background is blurred while the subject remains focused. Apple introduced this functionality in the iPhone 7 Plus and had kept it in the iPhone 8 Plus and iPhone X models, being one of the most appreciated features.
Although the function is found natively only in the most recent models, users of older copies should not feel unfortunate, because there are alternatives with which they can be compared. The following are four excellent applications that allow an iPhone to take photos in portrait mode.
1.- PortraitCam
It is a simple but powerful application that provides many tools. You can take a new picture directly, or you can import it from your photo library. When you have the image in PortraitCam, it will automatically try to detect all the faces of the photo. Usually, the results are decent, although to be perfect they require a bit of adjustment. Simply masking the areas you want to focus on and once this step is completed, PortraitCam keeps the sharp subject while blurring the rest.
You can adjust the intensity of the blur itself, to opt for a more subtle or more accentuated aesthetics. The application allows you to change the aperture of the blur, which changes the shape and direction of the effect. In addition to providing the possibility of the portrait effect, PortraitCam integrates many other features that make it worth adding to your photo toolkit.
2.- FabFocus
If you want to apply bokeh effect to your images, FabFocus is an excellent alternative to achieve it. It is a dedicated application of blurred background effects that incorporates many options. You can adjust the shape of the bokeh and the amount of blur, and even add a mask blur to create a more realistic depth effect.
The app uses face recognition technology to create an automatic blur effect around the point you identified as the face. If you can not find a look, you can manually adjust the mask after the initial impact, which makes it much easier to add the finishing touches quickly.
3.- AfterFocus
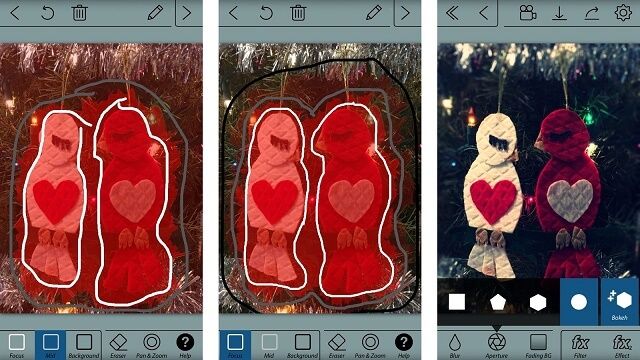
For those who want an intelligent application that achieves depth effects in their images without much effort, AfterFocus can be a good option. The app has a unique masking mechanism. Instead of “painting” a mask, you draw a line around the subject you want to highlight; Then, draw a second line, creating the background. You can adjust any error by adding more lines to a specific area.
Also, you can use a lens blur or motion blur to create a different effect, depending on the appearance you want to achieve. One can also adjust the type of blur used by selecting a different aperture. Finish the photo by adding a filter or bullet. You can even add stickers and labels.
4.- Fore Photo
It is a super simple application to add depth effects to your images. And has a user interface that is fast and responsive. Unfortunately, Fore Photo only allows you to import from the Photo Library. So you can not directly take a new photo while using the application. Although accessing your images is quick and easy.
At the moment you load the image, the application uses a neural network to detect subjects in the foreground automatically. Then it diffuses the background in a similar way to the depth of field in the DSLR.
Like other applications, Fore Photo is not perfect, although it is entirely accurate. You can edit the focus mask by painting what you want to focus on and use the eraser tool to clean the edges. Changes are made quickly and effortlessly.
